Editing the Predecessors/Successors Tables
You can rearrange the column order in the Dependency Tracer tables to match your preferences. To move a column, simply click and hold its header, then drag it to your desired position.
Columns with an asterisk (*) at the end of the header in either the Predecessors or Successors Table indicate that the data in that column is editable within the Table. The following fields are editable in both tables: Unique ID, ID, Type, and Lag.
Editing Number Data
To edit a displayed Unique ID, ID, or Lag value, begin by clicking inside the cell containing the data you want to change. From there, you can enter editing mode using any of the following methods:
-
Press the F2 key on your keyboard.
-
Click the cell a second time to activate editing mode.
-
Begin typing a number using any numeric key on your keyboard.
When editing mode is activated, a flashing cursor will appear inside the cell, and the cell's border will become more prominent to indicate it is active.
Adding Additional Dependencies
Additional Dependencies can be added to either table by entering a Unique ID or ID value into the first empty row:
| | In Master Project schedules that include “linked” subproject files, new dependencies can only be added using the Unique ID. Similarly, to modify an existing dependency and link it to a different activity, the Unique ID must be used. The ID field cannot be used for either of these actions.
|
Removing Existing Dependencies
Dependencies can also be removed from their corresponding tables by clicking on any cell in the row of the dependency you wish to remove and pressing the Delete key on the keyboard.
Editing Dependency Types
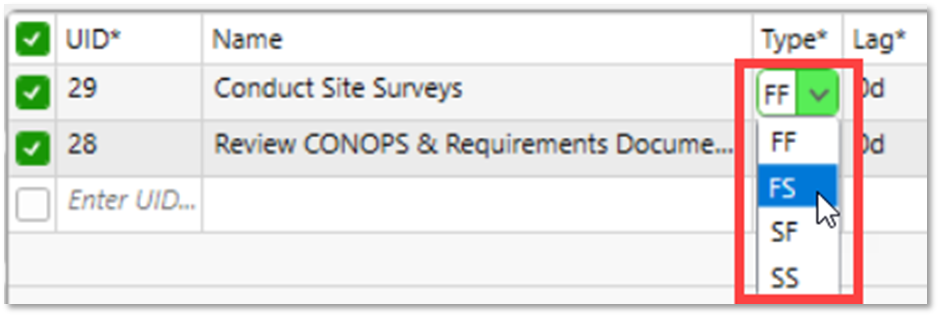
To edit the displayed Dependency Type, click on the cell in the Type column for the desired predecessor. This will display a drop-down control within the cell:
Clicking on the down arrow on the drop-down control will expand the menu, allowing you to select a new dependency type:
Any changes made to the data in the Predecessors or Successors Tables, including added or deleted dependencies, do not take effect until the Accept button in the Dependency Tracer has been clicked.
Navigating to Dependencies in the Project
You can navigate to any dependency listed in the Predecessors or Successors table by double-clicking any cell within the corresponding row. When this action is performed, the Dependency Tracer will locate and automatically select that activity in the Gantt Chart. If the activity is hidden due to a currently applied filter, the Dependency Tracer will first clear all filters and then reattempt the search to ensure the task is displayed.